22 Oct 2018

Examination Reliable School Management System

Examination module has 4 sections –

  1. Exam List
  2. Exam Schedule
  3. Marks Register
  4. Marks Grade

First we will prepare Marks Grade then create exam in Exam List then enter Exam Schedule then enter marks in Marks Register. Note that there is no need to prepare Marks Grade if your institution is not following Grading System in exams. Just leave Marks Grade & don’t make any entry in it.

  • Marks Grade– Go to Examination > Marks Grade enter Grade Name, Percent From, Percent Upto, Description & click on Save button. All the grades can be see at right side of this page.Examination Grade Report Reliable School Management System
  • Exam List– Go to Examination > Exam List enter Exam Name, Note & click Save button. All the exams can be see at the right side of this page, you can also check exam status by clicking View Status button.Exam List Reliable School Management System
  • Exam Schedule– Go to Examination > Exam Schedule this section has two parts 1) Adding/Editing Exam Schedule 2) Viewing existing Exam Schedule.
    For Adding/Editing Exam Schedule click on Add button then on next page select Exam Name, Class, Section then you will get all Subjects now enter Date, Exam Start Time, Exam End Time, Exam Room, Exam Subject Full Marks, Exam Subjects Minimum Passing Marks & click on Submit button to save exam Schedule. Exam Schedule Reliable School Management System
    For viewing existing Exam Schedule (go to Examination > Exam Schedule) select Class, Section then click Search button, you will see all exams under this Class-Section now click View to see Exam Schedule.Datesheet Reliable School Management System
  • Marks Register– Go to Examination > Marks Register Marks Register section has two parts 1) Adding/Editing exam marks 2) Viewing exam marks.
    For Adding/Editing Exam Marks click on Add button then on next page select Exam Name, Class, Section then you will get all students list now enter marks for all the exam subjects & click on Save button to submit marks. Marks Entry Reliable School Management System
    For viewing Exam Marks (go to Examination > Marks Register) select Exam Name, Class, Section to see marks list. Result Reliable School Management System
Share this
22 Oct 2018

Attendance Reliable School Management System

Student Attendance  module has 3 sections –

  1. Student Attendance
  2. Attendance By Date
  3. Attendance Report

First we will enter Student Attendance then we will search student attendance for a particular date or we can get whole month students Attendance Report.

  • Student Attendance– Go to Attendance > Student Attendance select Class then Section then Attendance Date then click Search button. Now below you can see list of students & attendance options like Present, Late, Absent etc. Select the attendance for students then click on Submit Attendance button. To enter National Holiday or Sunday select Mark as holiday button then Submit Attendance button. Note that is attendance is already submitted for a date then you can only edit attendance.Attendance Report Reliable School Management System
  • Attendance By Date– Go to Attendance > Attendance By Date to check attendance for a particular date select Class then Section then Date then click on Search button. Attendance Report Reliable School Management System
  • Attendance Report– Go to Attendance > Attendance Report to check attendance for a whole month select Class then Section then Month then click Search button. Attendance Report Reliable School Management System
Share this
07 Oct 2018

Expenses Reliable School Management System

Expenses module has 3 sections –

  1. Add Expense
  2. Search Expense
  3. Expense Head

First we will create our Expense Head then we will Add our daily/monthly Expenses then we will Search our Expense.

  • Expense Head– Go to Expenses > Expense Head enter Expense Head and its Description then click on Save button. All expense head can be see right side of this page.Reliable Public School Expenses Head
  • Add Expense– Go to Expenses > Add Expense select Expense Head then enter expense Name then Invoice Number, Date of expense then Amount then Attach Document then Description & click on Save button. Recently added 10 expenses can be see right side of this page. Reliable Public School add expenses
  • Search Expense– Go to Expenses > Search Expense to search expenses between two dates or by a keyword select Date From & Date To or enter keyword then click on Search button, you will get the list of all expenses related to your search criteria.Reliable Public School Search Expens
Share this
07 Oct 2018

Income Reliable School Management System

Income module has 3 sections –

  1. Add Income
  2. Search Income
  3. Income Head

First we will create our Income Head then we will Add our daily/monthly Incomes then we will Search our Income.

  • Income Head– Go to Income > Income Head enter Income Head and its Description then click on Save button. All Income head can be see right side of this page.Reliable Public School Income Head
  • Add Income– Go to Income > Add Income select Income Head then enter Income Name then Invoice Number, Date of Income then Amount then Attach Document then Description & click on Save button. Recently added 10 Incomes can be see right side of this page. Reliable Public School Income
  • Search Income– Go to Income > Search Income to search Incomes between two dates or by a keyword select Date From & Date To or enter keyword then click on Search button, you will get the list of all Incomes related to your search criteria.Reliable Public School search Income
Share this
07 Oct 2018

Fees Collection Reliable School Management System

Fees Collection module has 10 sections –

  1. Collect Fees
  2. Fees Master
  3. Fees Group
  4. Fees Type
  5. Fees Discount
  6. Search Fees Payment
  7. Search Due Fees
  8. Fees Statement
  9. Balance Fees Report
  10. Fees Carry Forward

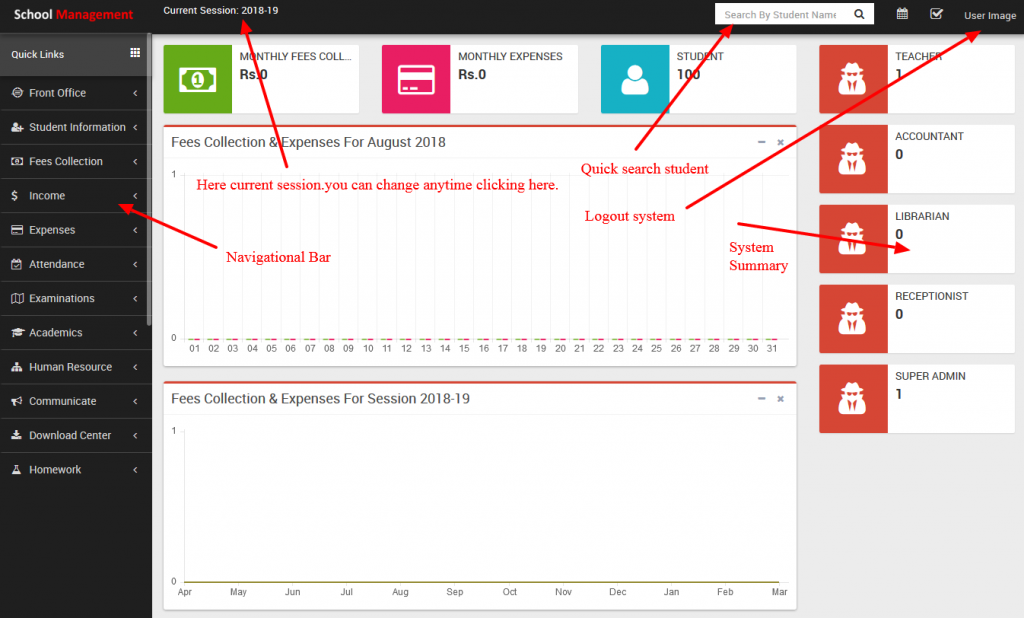
First we have to prepare our Fees Structure by configuring Fees Type, Fees Group and Fees Master then we will Collect Fees of students then we will understand and review various fees reports by using Search Fees Payment, Search Due Fees, Fees Statement and Balance Fees Report.Remember Fee Structure is session based.

Lets understand how we will create fees structure in Reliable School Management System by using Fees Type, Fees Group & Fees Master. Fees Type means different types of fees can be collect by school e.g. Admission Fees, April Month Fees, May Month Fees, June Month Fees, Exam Fees, Dress/Uniform Fees, Library Fees, Sports Fees, Transportation Bus Fees, Picnic Fees etc. Fees Group Fees Group is use to make grouping of different Fees Type Then you can assign/allocate this Fees Group to whole class-section or a particular student. When you assign/allocate a Fees Group on a class-section or a particular student all Fees Type under this group with their Fees Master amount will be applied directly. You can assign/allocate multiple Fees Groups on a class-section or a particular student. Suppose we have created a Fees Group with the name Class 6 (2 Instalments) and added Fees Types Admission Fees (Rs.1000), 1st Instalment (Rs.2000), 2nd Instalment (Rs.2000) then assign/allocate this Fees Group Class 6 (2 Instalments) on those students only who want to pay fees in 2 Instalments. You can create another Fees Group with the name Class 6 (1 Instalments) and add Fees Type Admission Fees (Rs.1000), Full Instalment (Rs.6000). You can also create another fees group with the name Class 6 Transport Fees and add Transport Fees as Fees Type and assign/allocate on those students who use transport facility.

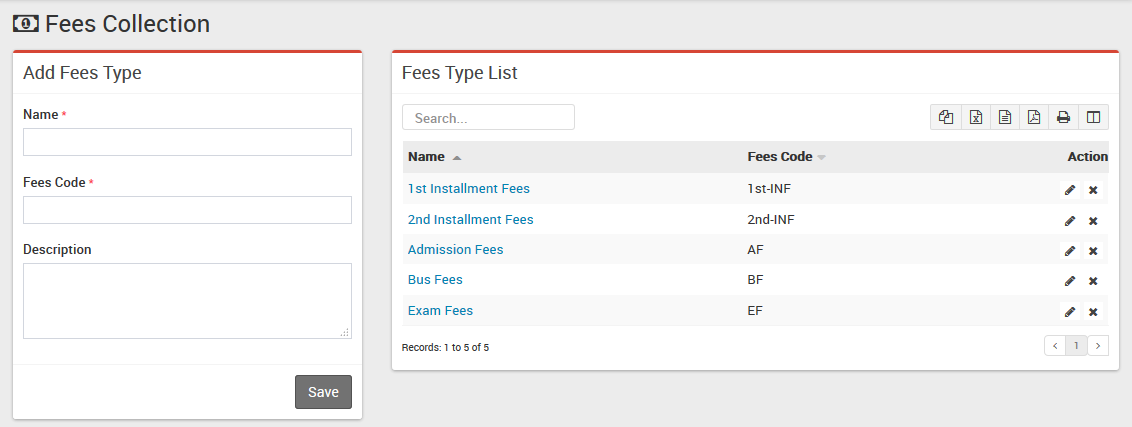
  • Fees Type– Go to Fees Collection > Fees Type add all your Fees Type here with Fees Code. All Fees Type can be see at right side of this page.Reliable Public School Fee Type
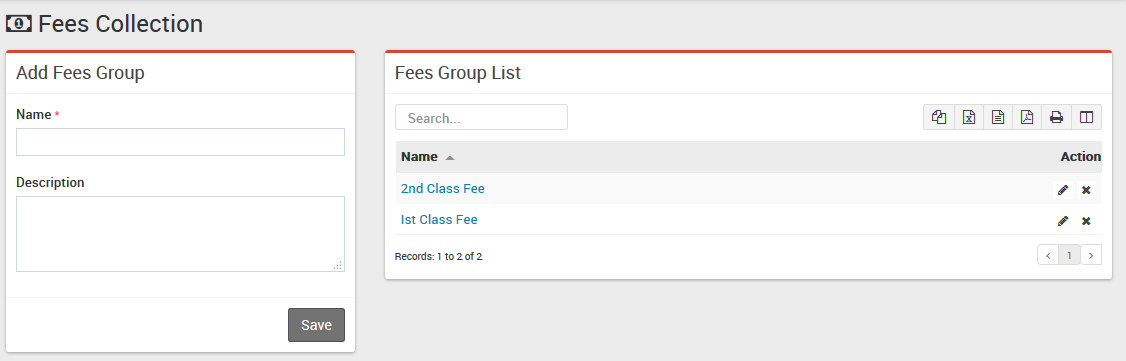
  • Fees Group– Go to Fees Collection > Fees Group add all your Fees Group here. All Fees Group can be see at right side of this page.Reliable Public School Fee Master
  • Fees Master– Go to Fees Collection > Fees Master add all your fees amount for current selected session here. Select Fees Group then Fees Type then Due Date then enter Amount means fees amount for selected session now click Save button. All Fees Master with Fees Group and Fees Code with amount can be see at right side of this page for current selected session.Reliable Public School Fee Master        
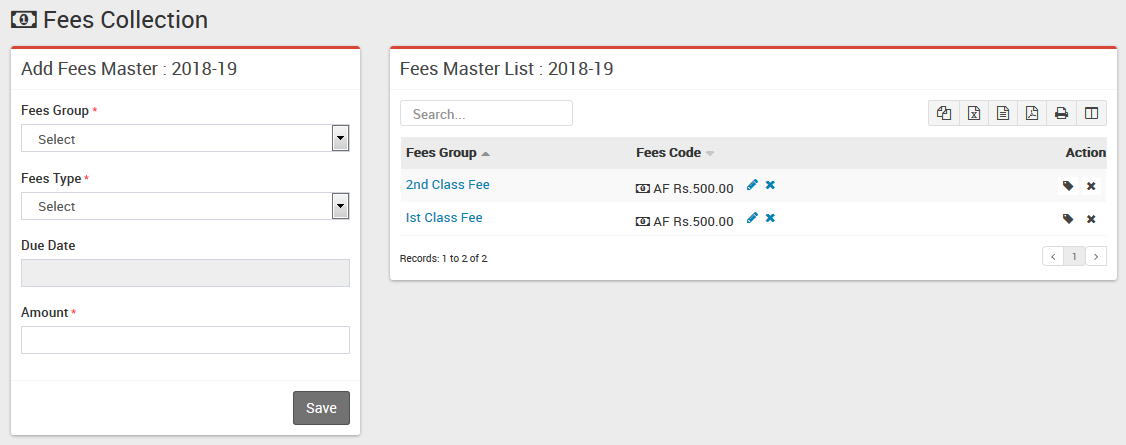
To assign/allocate Fees Group click on Assign/View button from Action column. Now at next page select Class then Section and click on Search button. Now select the students on which you want to assign/allocate this Fees Group then click on Save button.
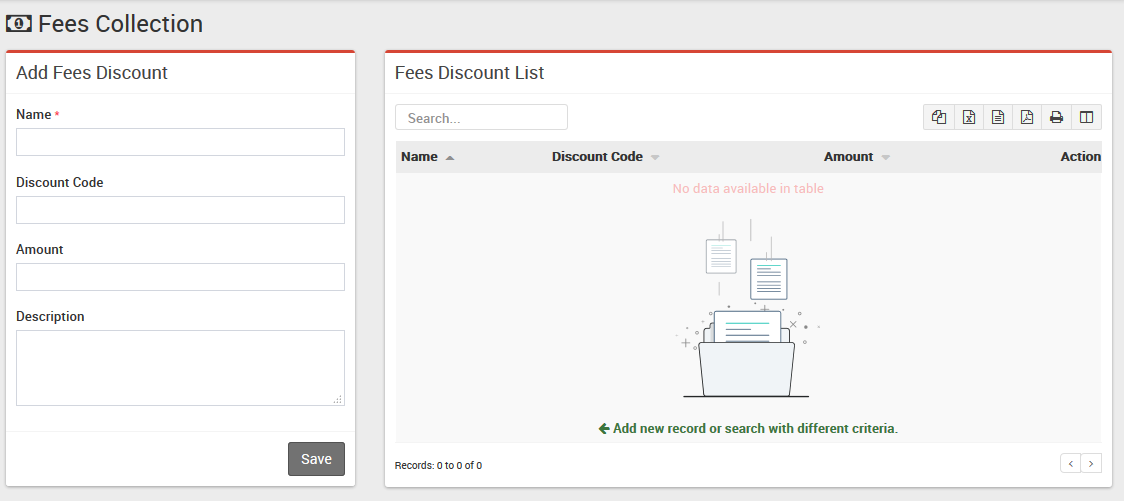
  • Fees Discount– Go to Fees Collection > Fees Discount add all your Fees Discount here with Discount Name, Discount Code, Amount and Description. All Fees Discount can be see at right side of this page. To assign/allocate discount click on Assign/View button from Action column.Reliable Public School Fee Collection     On Next page select Class and Section then click on Search button. After Search select students on which this discount have to be applied then click on Save button
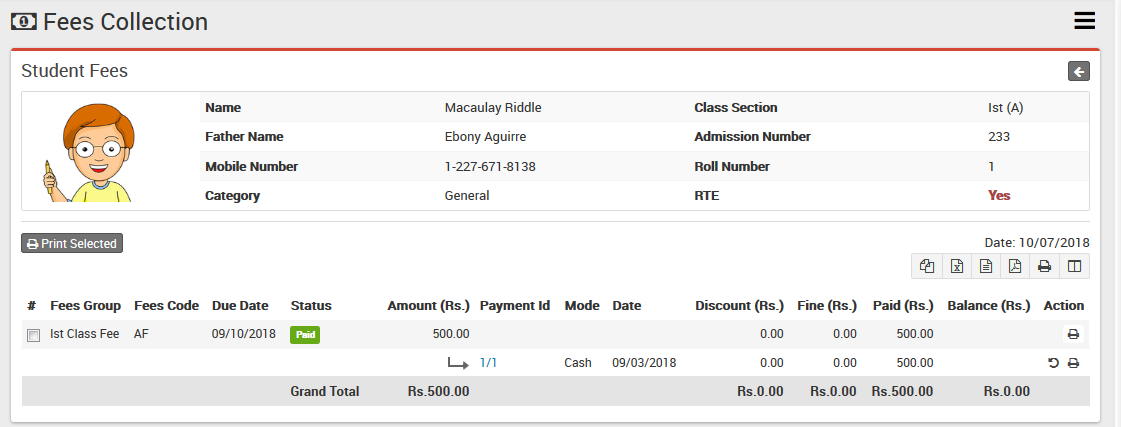
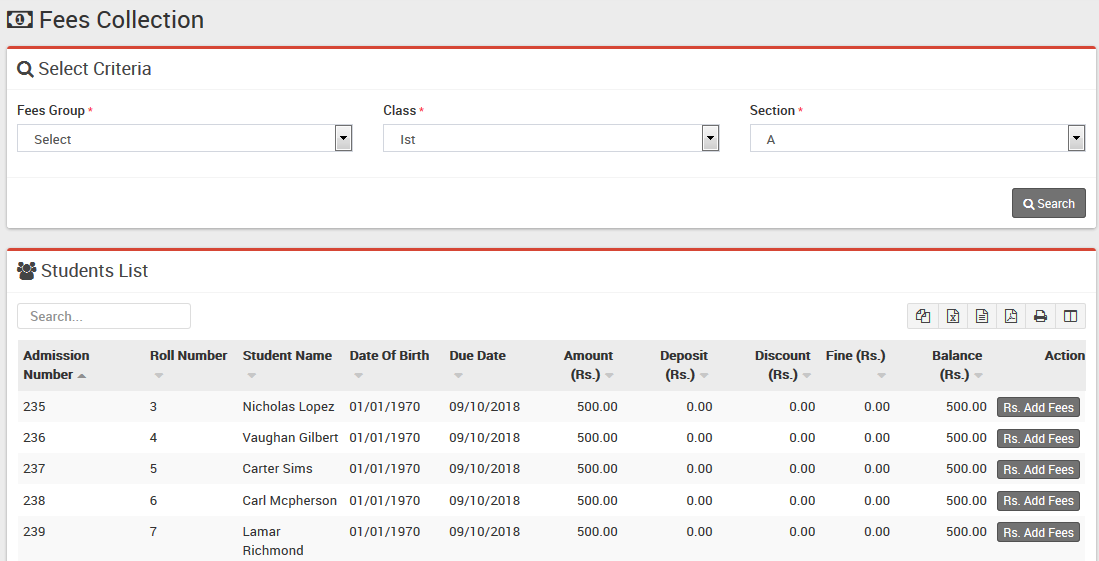
  • Collect Fees– Go to Fees Collection > Collect Fees select Class & Section & click in Search button to get student list under this class-section. You can also search student by keyword in Search Input Box and click on Search button. After search you will get student list below. Click on Collect Fees button to go to collect fees page. Here you can see student details including student picture then next you can see all assign/allocate fees details. Collecting fees is very simple just click the + button from Action column a modal window will appear, here select Date then Amount will be auto fetch by balance for this Fees Invoice. You can enter any amount for Partial Fees payment, then select Discount Group or enter Discount (if any) then enter Fine (if any) then Payment Mode then Note then click on Collect Fees button. Now fees has been collected & Revert button visible for reverting this fees. For printing Fees Receipt click on Print button from Action column.Reliable Public School Collect Fee
  • Fees Discount Adjustment: If you have applied discount by selection of Discount Group then there is no need for any adjustment. When you assign/allocate Fees Discount on any student then it will be only assigned. To make it apply you need to adjust this discount on any Fees Invoice payment by giving discount. To apply discount you need to first give discount on any fees invoice then click on Apply Discount button from Action column, a modal window will be open. Here enter Payment Id on which this discount has been given and enter description (if any). Now click on Apply Discount button to apply discount.
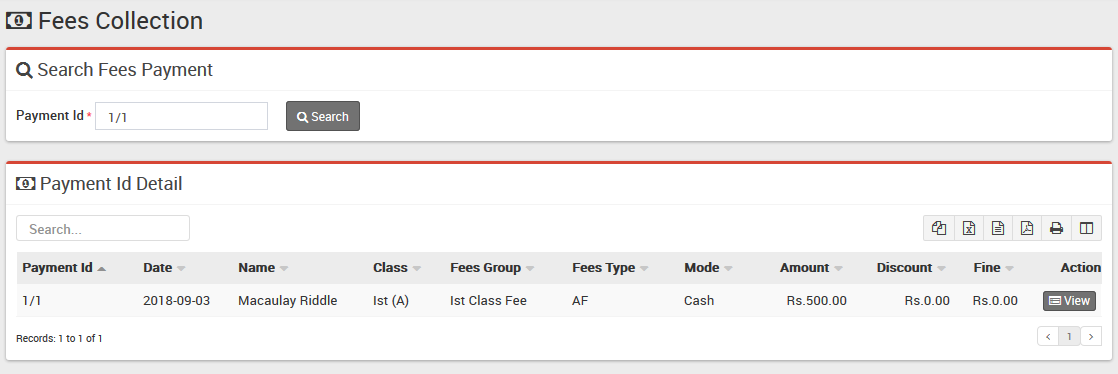
  • Search Fees Payment– Go to Fees Collection > Search Fees Payment for searching any fees payment details through Payment ID enter Payment Id & click search button you will get the details for this payment id.Reliable Public School Payment Details
  • Search Due Fees– Go to Fees Collection > Search Due Fees for searching those students who have not done payment for a particular fees type then select Fees Category then Fees Type then Class then Section & click Search button, you will get all the students list for due fees.Reliable Public School Due Fee
  • Fees Statement– Go to Fees Collection > Fees Statement to get fees statement for a student. Select Class then Section then Student then click Search.Reliable Public School Fee Statement
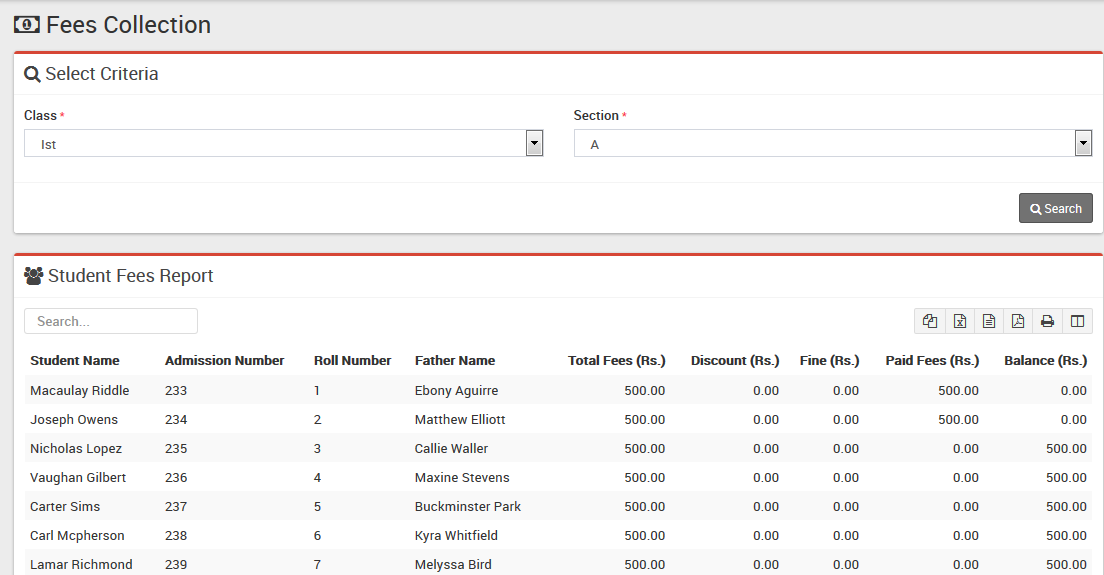
  • Balance Fees Report– Go to Fees Collection > Balance Fees Report to know Total Fees, Total Paid Fees & Total Balance Fees in a particular Section, select Class then Section then click on Search button.Reliable Public School Balance Report
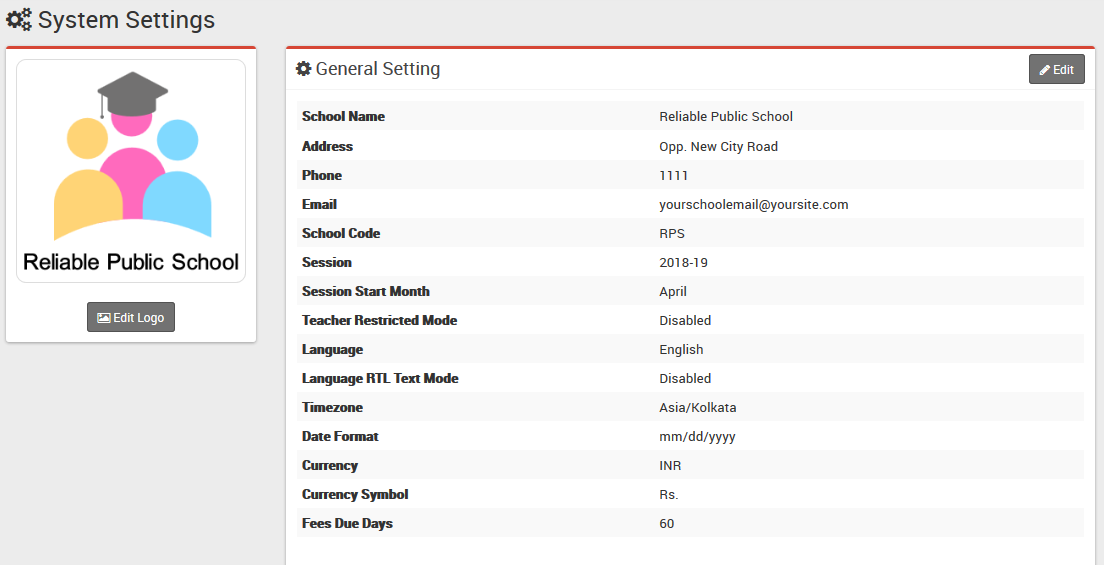
  • Fees Carry Forward– Go to Fees Collection > Fees Carry Forward if any student has balance fees in previous session then you can forward this balance fees to current session. Select Class, Section then click Search button. Students with balance fees will be display below. If you want you can edit balance fees amount to be forward. In Top right corner you can see Due Date for all these fees forward. This Due Date will be number of days ahead which is set in System Settings > General Setting > Fees Due Days. This balance fees carry forward can be see in collect fees page as Balance Master (Fees Group) and Previous Session Balance (Fees Code).


Note: Fees Type and Fees Group are not dependent on Academic Session but Fees Master is created session wise so you need to enter Fees Master data for every session.

Share this
06 Oct 2018

Academic Details Reliable School Management System


After completion of  basic setup of school, its time to add academic details in Reliable School Management System like Classes, Sections, Subjects, Teachers.

  • For adding classes go to Academics > Classes, before adding classes first add Sections from Academics > Sections. Select Sections comes under a Class when you adding a Class. Classes can be add from left side Add Class form and added classes can be see right side Class List. Add all classes running in your school here.Academic Details Reliable School Management System
  • For adding sections go to Academics > Sections, Sections can be add from left side Add Section form and added section can be see right side Section List. Add all section name used in your school here e.g. Class 1 has 3 sections A, B, C and Class 2 has only A, B sections then we will add 3 sections A, B, C here. After adding sections, select section comes in a Class when you adding Classes.Academic Details Reliable School Management System
  • For adding Teachers go to Human Resource > Staff Directory, Teachers can be add from top right corner Add Staff button. At this page you can add any staff by selecting its role. If we are creating teacher then we should select Teacher as role and designation as role.Academic Details Reliable School Management System
  • For adding subjects go to Academics > Subjects, Subjects can be add from left side Add Subject form and added subjects can be see right side Subject List. Add all subjects including theory and practical in your school here. Subjects will be assign to their classes in next step.Academic Details Reliable School Management System
  • For assigning subjects to their classes go to Academics > Assign Subjects select Class 6 and section A then click on Search button, now below a row has been open for selecting subject and teacher for this subject. For adding more rows click on Add button. After selecting all subjects and their concerning teachers click on Save button in present right bottom to save all subjects and teachers under this class-section.Academic Details Reliable School Management System
  • For assigning Class Teacher on Classes go to Academics > Assign Class Teachers select Class 6 and section A then check on Teachers you want to assign as Class Teacher. Academic Details Reliable School Management System

Great! Reliable School Management setup is completed. Next we will discuss Student Information module.


Share this
04 Oct 2018

System Settings Reliable School Management System

  • In the Admin panel click on Edit button to update your school data under System Settings > General Setting in upper right side .
  • System Setting Reliable School Management System
  • Update detail like School Name, Address, Phone, Email, School Code (Your school affiliation / accreditation no), Session (current running Academic Session for the school), Session Start Month, Teacher Restricted Mode, Language , Language RTL Text Mode (applied only to Arabian side languages), Timezone, Date Format, Currency (ISO standard 3 digit currency code), Currency Symbol and Fees Due Days (used in Fees Carry Forward) now click on Save button to update record.
  • For updating logo click on Edit Logo button,choose your school logo file (it is recommended for logo to use .png image with transparent or white background and around 200px x 200px in size) now click on Edit button to update logo image.
  • For automated SMS messaging add any one of available SMS Gateway with the required details from System Settings > SMS Setting.
  • To enabling online payment in Parent Panel and Student Panel update your payment gateway account details for this, go to System Settings > Payment Methods select your appropriate payment gateway and add you payment gateway account details then click on save button and enable it from right side box.
  • At this point we have completed basic setup of our school. Now we will add our academics in Smart School like Classes, Sections, Subjects, Teachers.

Note: In Teacher Restricted Mode teachers can see only their allotted class student data as Class Teacher or as Subject Teacher)

Share this
02 Sep 2018

Using Reliable School Management System

You don’t have to take any panic on how to do the things.We are providing the Reliable School Management System as SAS.We will setup the things according to you/your school and provide details to you.

Before start using our Reliable School Management System consider a general scenario of typical school of class 1 to 12th, each classes have sections like Section A, Section B. Students enter in classes by new admission or promoted from previous class after successful passing of previous class. During course of student we will charge fees to students and collecting them at monthly or one time basis. We like to record attendance of our students. There will various subjects for different classes like some subjects are theory and some are practical. Exams are created using these subjects and classes. Our School may be providing transport facility to student. Our school have hostels and providing hostel facility to our students. Obviously our school has teachers to teach and manage students. We like to communicate our teachers, students and parents. Our school have library for students have to maintain books inventory. We like to record all the expenses done in our school like miscellaneous bills, salary payments etc. After everything we like to analyze various reports based on our school.

Apart from above we provide access to Reliable School Management System to other users like Teachers, Accountants, Librarians, Students and their Parent. For these Smart School have 8 inbuilt user’s roles- SuperAdmin, Admin, Teacher, Accountant, Librarian, Receptionist, Student and Parent. Virtually you can create unlimited number of user roles for staff members.

Click here to learn how to Login to Admin Panel and learn the various parts of the system and how they work.

Share this
02 Sep 2018

Login to Reliable School Management System Admin Panel

As we are providing Reliable School Management System as SAS, we will make url for Login to Admin Panel.

Login to Admin Panel through URL – http://schoolname.relaut.com/site/login

For our demo you can click here to login and see the working of Reliable School Management System without paying any amount.

Login to Demo Admin Panel


After successful login you will reach to Admin Dashboard. Below you can find navigational overview of screen.

Reliable School Management System Admin Panel

Here are some of the modules provided in the panel –

  • Front Office – for all reception/front office related activities like enquiries, calls, visitors, postal receive/dispatch
  • Student Information – for all the information related to student like student search, profile, student admission, student history
  • Fees Collection – for all the details related to student fees collection, fees master creation, fees dues, fees reports
  • Income – for all the income other than fees collection can be manage here like add income, search income, income head
  • Expenses – for all the expenses related to school can be manage here like add expenses, search expenses, expense head
  • Attendance – for managing student attendance and attendance report
  • Examinations – for managing all the exams conducted by school like create exam, schedule exam, exam marks entry, marks grade
  • Academics – for managing all the parameters / master data required to run school like classes, sections, subjects, assign teachers, class timetable, promote student to upper class
  • Human Resource – for all the information related to staff members can be manage here like staff search, profile, attendance, payroll, leaves
  • Communicate – it works like a notice board basically a messaging system for communication to students, parents and teachers
  • Download Center – for managing downloadable documents like assignments, study material, syllabus and other documents need to distribute students and teachers
  • Homework – teachers can give homework here and further evaluate them
  • Library – all the books in your library can be manage here
  • Inventory – manage all the assets of your school with stocks and store under inventory module
  • Transport – for managing transportation service like routes and their fares
  • Hostel – for managing hostels, hostel rooms and their fares
  • Certificate – design and generate student certificate and ID Card here
  • Front CMS – manage front public site of Smart School here by creating pages, menus, events, gallery, news
  • Reports – all the various reports related to different modules can be found here
  • System Settings – configure Smart School here for different settings like school, sessions, admin password, SMS, Paypal, backup / restore, languages
  • Calendar & ToDo List – track and manage all daily/monthly activities and create your task in to do list

To understand how Reliable School Management System works first we need to configure and setup it for our school. In the next article/ documentation we will change some basic settings according to our school.

Share this

© 2014 Reliable Automation. All rights reserved.

Click Me
× How can I help you?